
Using a USB or FireWire Drive for Disaster Recovery.
Part 3 of 6
Preparing a boot menu suitable for booting from the USB / FireWire drive.
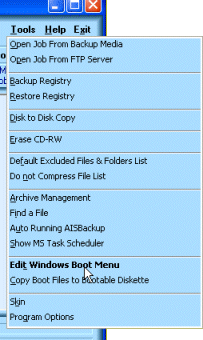
The first stage is to copy the boot files from the C: drive to the K: drive. Start the boot menu manager by using the AISBackup menu option Tools / Edit Windows Boot Menu.
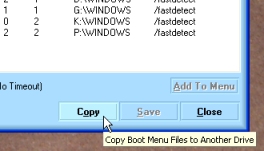
Ensure that the current boot drive is selected, in this case C:, then click Copy.
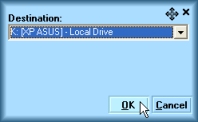
Choose K: as the destination.
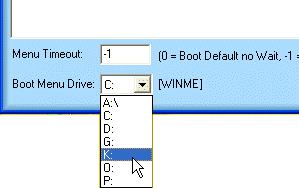
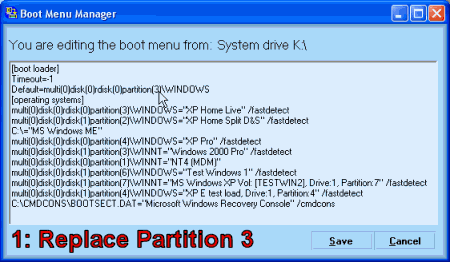
The next thing to do is change the boot menu so that it is suitable for booting Windows from the USB drive. The USB drive will be connected to the PC as disk 0 and Windows will be booted from partition 1.
After copying the boot menu files to the K: drive select the K: drive copy of these files. Note: There is a bug in AISBackup version 2.0 of the boot menu editor which means that you must close and re-open the boot menu editor to enable the selection of the boot menu files from the K: drive. This bug is fixed in version 2.1.
Click Edit File to edit the boot.ini file, then follow the instructions below.
-
Double check that you are editing the correct boot menu, i.e. you must edit the copy not the live boot menu.
-
Select the partition from the Default entry and if required change to 1.
-
Select the corresponding entry under [Operating Systems] and change the partition number to 1, if required.
-
Select all the other menu entries then press DELETE on the keyboard to remove them.
-
Click Save to save the boot menu.
A possible complication
On our SATA Windows XP system the boot files and operating system both reside on the second Partition of the disk. It follows that the boot partition is currently 2 but on the USB backup disk it is going to be partition 1. If we were to change the current partition to 1 then we will not be able to boot into Windows (That would point to FAT32_SATA in the example below), although it is possible to add an additional entry for disk 0, partition 1, this may lead to some confusion selecting from the menu when loading Windows.

The Boot and System drive is on Partition 2

The boot menu also indicates that Windows is booting from
partition 2.
The solution here is to set-up the boot.ini file with the correct entries directly on the USB backup drive, and then de-select the boot.ini file from the source of the backup, so that the correct boot.ini file is not replaced during the backup process. To achieve this:
-
Copy the boot files to the USB backup partition.
-
Edit the boot.ini file on the USB drive.
-
De-Select the boot.ini file from the backup job (after we have created it).
Click here for instructions on how to Prepare the Disk to Disk Backup Job.