
Using a USB or FireWire Drive for Disaster Recovery.
Part 6 of 6
Testing the backup copy of Windows.
-
Carefully remove the disk from the USB or FireWire caddy.

-
Switch off the PC and remove the outer case or side panel opposite where most of the peripheral wires plug in.
-
Carefully remove the IDE ribbon cable from the internal disks.
If the internal disks are SATA and the backup drive is IDE then you need not remove the SATA cable, but you may need to purchase an IDE cable for the IDE drive. If you cannot wait then you may use the cable connected to the CD or DVD drive instead, but this cable may not be completely suitable for live running, as most of today's IDE drives run a lot more efficiently with 80 strand cable rather than the older 40 strand cable. A 40 strand cable may (but not always) have been used to connect the CD/DVD drive.
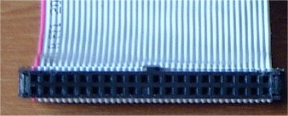
40 strand IDE Cable
-
Connect the IDE cable to the disk, if you are using a new cable connect the other end to the Primary IDE channel on the Motherboard. Refer to the PC motherboard manual for details, the primary IDE connector on the motherboard is usually coloured blue. Ensure that the cable is the correct way up, there is usually one pin blanked off on the the cable, if the cable is forced into place upside down then you will have damaged the disk or motherboard! There is also a raised section on the plastic socket which corresponds to a cut-out on the disk itself.

80 Strand IDE cable: The blue end plugs into Motherboard
IDE Connector on disk, notice the cut-out which corresponds to the raised section of the IDE cable.
An IDE Cable usually has 3 sockets on it. One end plugs into the motherboard and the other two sockets plug into what is known as the Master and Slave disks. There is a jumper on all disks which is used to select whether the disk is a master or slave disk. There is another setting called Cable Select, which is used when the physical socket of the IDE cable determines the master or slave setting.
You may notice a jumper between the IDE connector and power connector, above. Ensure that this connector is set to MASTER, or MA. There should be a diagram on the disk showing the settings. A setting called CABLE SELECT or CS may be used, but ensure that you use the socket at the front of the IDE cable when connecting to the disk.
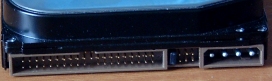
Connect one of the power cables to the disk, again, these can only be connected one way.
Here is a picture of a connected drive, ready to go.

-
If the PC previously used an IDE disk, just switch it on to test the backup. If the PC Previously used a SATA disk and the backup is on an IDE disk then you should change the boot order in the PC's CMOS settings to boot from HDD 0 rather than SATA (or SCSI on some PC's). To change the CMOS settings enter the keyboard appropriate command during the boot cycle, this is normally done by pressing the DELETE key. Refer to your PC manual or search the internet for something like "cmos settings dell". You may also want to search for "*** setting boot order" where *** is the computer manufacturer or motherboard manufacturer and product number.
This concludes the tutorial on creating and testing a USB or FireWire backup suitable for replacing the hard drive in the event of a catastrophic failure.
More suggestions:
-
You may think it appropriate to set-up a scheduled task to keep the USB backup up-to-date.
We suggest: That it is better to manually run a backup to update the USB backup because an auto-run job may accidentally copy corrupt information over to the disk. It is better to only periodically update the USB / FireWire disk, it will not take long to update the backup disk from your regular automated backup of the Windows disk. Indeed, you may have enough space on the same USB drive to hold the automated session based backup in another partition.
-
You could save some time by setting up a desktop shortcut for the disk to disk backup by using the Manage Backup / Create Shortcut for this backup job option.
-
Depending on the importance of the data, you may want to create two external copies of the Windows System and keep one copy at a different physical location. This will cover you from fire and theft. But remember that the disk may only work if installed in a very similar PC configuration, and the Microsoft Operating System's that require activation will need re-activating if the disk is installed in a different PC.