
AISBackup: Restore Scenario 1 - Emergency System Restore.
This Operating System Restore procedure is only for Windows 95, 98 & ME. For Windows NT, 2000 & XP click here.
Introduction
Here is the procedure for restoring an Emergency System Backup that was created in Scenario 1 'Securing the C: Drive'.
The Scenario is split into 2 stages, this stage is Restoring the Emergency System Backup and stage 2 Restoring the rest of the C: drive.
The Scenario
Your hard drive has become faulty, you have purchased a new Hard Drive and you want to restore your system back to how it was the last time you backed up your C: drive.
You have physically installed the drive, you have determined whether you need to boot from the Windows Emergency Restore Diskette, or from the Bootable version of the Emergency System Backup CD.
What you need.
Either the Windows Emergency Restore Diskette, or the Bootable version of the Emergency Backup CD.
The CDs containing the Full backup of the C: drive.
Step 1 Booting the system.
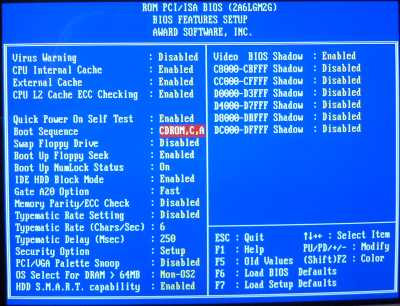
If you are going to boot the PC from a CD you will probably have to change the CMOS settings of the PC to enable this. Please refer to your PC documentation. an example screen shot is shown below.
Either place your bootable Emergency Restore CD in the CD-ROM device, or the Windows Emergency Restore Diskette in the diskette drive and turn on your PC or press Ctrl, Alt & Delete. Note, if using the CD, this must be placed in a SCSI or IDE connected CD-ROM a USB device will not work at this stage (unless of course PC technology improved again!).
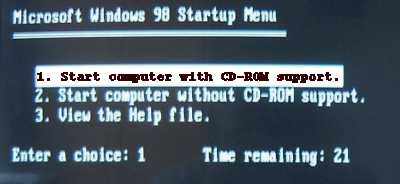
Once the PC has booted you will be presented with some boot options, this list differs slightly depending on whether you are running Windows 95, 98 or ME. In either case select 'Start the PC with CD-ROM support', see the slightly doctored picture below:
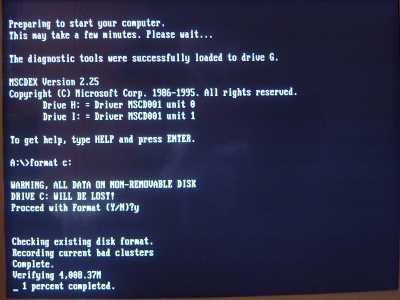
After the PC has booted make a note of the CD-ROM drive letters. In the screen shot above, I have started to format the C: drive by typing format c: then pressing <Enter>.
DO NOT format the C: drive if the backup you are restoring is located there instead of a CD.
For this scenario I will now refer to the CD-ROM by the drive letter H:
You may have to run FDisk on a new Hard Drive, if so ensure that you set the Primary drive (the new C: drive) as ACTIVE, or else you will not be able to boot from it. Running FDisk will require a further re-boot. Please refer to your PC documentation, or nag me to put some more detail about FDisk here.
If you have booted from a CD you will notice that it has booted as an A: drive. This A: drive only contains the boot image created from the Windows Restore Diskette, the actual AISBackup files are on the H: drive. (Yes the CD is an A: and H: drive).

In the following examples the ![]() indicates a space. <ENTER> indicated press the Enter Key.
indicates a space. <ENTER> indicated press the Enter Key.
Once the C: drive has been formatted you may start the restore by typing:
a:\smartdrv <ENTER> (If you remembered to put smartdrv.exe on the boot disc)
h:\restore![]() H:
H:![]() C
<ENTER>
C
<ENTER>
Note the ':' after H and no ':' after C, the actual restore files may be under a sub directory of h:, e.g. h:\backup in which case the command will be:
h:\backup\restore![]() h:\backup
h:\backup![]() c
<ENTER>
c
<ENTER>

The above screen show the progress of the restore process.

The above screen shows that phase one of the restore process has completed.
Remove either the Windows Restore Diskette or the Bootable CD-ROM, or both then press Ctrl, Alt & Delete on your keyboard, alternatively turn the PC off then Back on.
For the next phase please make sure that the CD-ROM has no CD in it or you may be presented with a Windows 'Blue Screen of Death'.

Your PC will now boot into a partially re-created Windows session, if requested type your Username and Password, If you cannot remember the Username and Password from when the Emergency System Backup was taken, press the Esc key on the keyboard.
AISRestore will now complete phase 2 of the restore process, see the blurred screen shot above.
When the second phase of the restore finishes you may be presented with a number of 'cannot find' error messages, this is normal so please just acknowledge these prompts.
Before you can use your CD Writer you may have to re-start Windows. Re-start Windows anyway - just in case.
In the unlikely event the second phase of the restore does not start automatically please locate and run (double click) c:\AISRSTR\AISBRSTR.EXE this will perform the 'long filename' phase of the restore.
Emergency Restore Completed - What Next?
This completes the Emergency Restore of your system, the whole process should have only taken about half an hour.
This version of Windows is pretty useless though, none of your favorite programs will have been restored and the version of Windows currently running may be months old. But what this version of Windows will allow is to restore from other AISBackup.
For instructions on how to restore the rest of the C: drive, click here.