
Format a disk on Windows XP, Windows Vista and Windows 2000.
This page shows you how to format a disk drive into one primary partition and one extended partition containing one logical drive.
These instructions were originally written as a guide to formatting a disk partition for dual or multi-boot system's. If you are formatting a USB or FireWire for a disaster recovery backup, format the drive using the same drive type as the current Windows drive. On PC's with one operating system this drive is most likely to be the C:\ drive.
Drives that are to contain a boot files must reside in Primary Partitions and not as a logical drive in an extended partition. This partition must also be marked as Active, or it will not be bootable.
Disk Management Form:
Microsoft indicate the drive containing the boot files as the (System) drive and the drive that contains the current running operating system as the (Boot) drive (I think this should have been the other way round). If the boot and system drive are the same Microsoft indicate this with (System), i.e. there is no (Boot) indicator.
What you will need
An unformatted disk which has been installed on your system as a slave to your existing hard drive, or a USB/FireWire connected drive.
Instructions
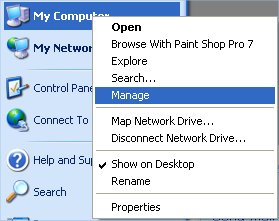
Start Manage Computer by clicking Start / Right Click My Computer / Select Manage.
Expand Storage and select Disk Management.
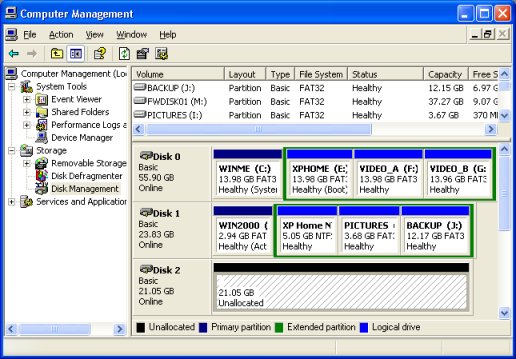
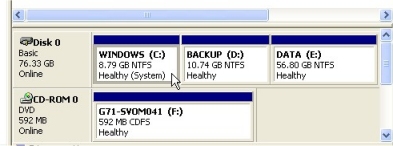
You can just about see from the above screen that the boot files reside on the C: drive and the current running operating system is on the E: drive. If you are about to create a bootable image on a USB / FireWire drive make a note of these drive letters. If your PC only runs one operating system the System and Boot drive will be the same, this is indicated by (System) and is most likely to be the C: drive, see below.
Creating the Primary Partition
Select the new drive, in the above example this is Disk 2.

Right click on the image of the disk and choose the menu option New Partition. This starts the Windows New Partition Wizard.
Click Next.

Leave the selection on Primary Partition.
Click Next.

Enter the size of the partition, here we have entered 10240, 10GB.
Click Next.
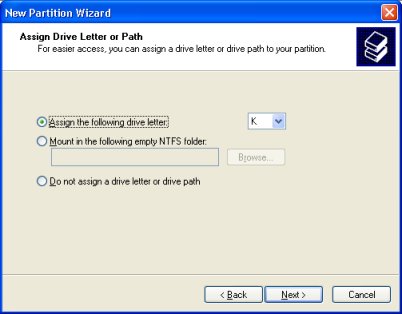
Select the drive letter that you want this partition to use. Note, the drive letter is very likely to change when viewed from Windows 95, 98 or ME. This is not a problem but is worth remembering.
When you format the drive you should give the partition a unique name so that the disk can be easily be identified regardless of the operating system you are running. Remember drive letters can be altered in Windows 2000 and XP so drive H: in Windows XP may be drive E: in Windows 98, setting the volume label to 'XP-2' will enable you to identify the drive from either operating system.
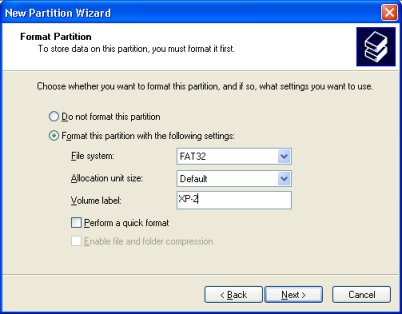
If you want to be able to view the contents of this drive from Windows 95 (OSR2), 98 or ME then choose the FAT32 file system. The volume name in this example has been set to XP-2.
Note that Windows 95 version 1 cannot access FAT32 drives. No version of Windows 95, 98 or ME can access NTFS drives, although there are some third party utilities that allow you to read NTFS drives from these operating systems.
Choose the same File System as the existing Windows drive if you are formatting a drive to be a mirror image of your existing Windows drive.
Click Next.
Click Finish.
Windows will now format the drive.
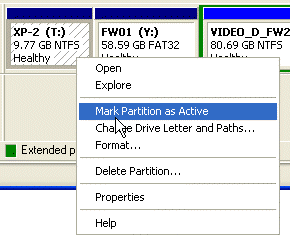
Marking the Partition as Active.
If the formatted partition is to be used as a boot drive it must be marked as Active. Be careful not to mark a second primary partition on the normal boot drive as Active if it does not contain the relevant boot files, or the PC will not start!
Creating the Extended Partition.
Right click the Unallocated space and choose New Partition.
On the Partition Type form select Extended Partition.
Leave the size as the remainder of the space on the drive, Click Next.
Click Finish.
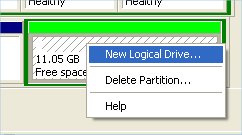
Creating the Logical Drives.
Right click the Extended Partition and select New Logical Drive.
Keep clicking Next making appropriate changes to the file size, drive letter and partition type. As stated above, it is a good idea to give the drive a unique name rather than using the default New Volume.
Back to:
Part 2 of Using a USB or FireWire Drive for Disaster Recovery.
Part 1 of Using a USB or FireWire Drive for Disaster Recovery.