
AISBackup: Setting the Program Options
Once you have registered AISBackup you will have to review and set the program settings and options. Most of the options can be left as default, but if you often Format your C drive and re-load the operating system, you may want to locate the Database files (Database Location) on another drive.
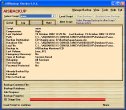
The Options – Backup Options.
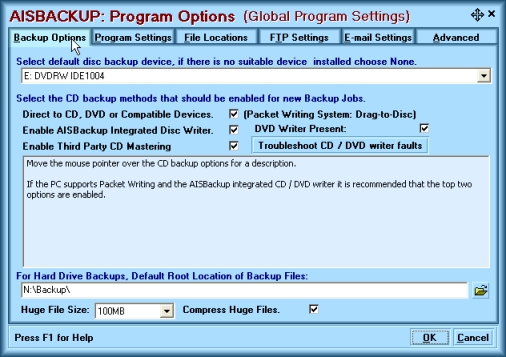
-
Select Device: Specifies the drive letter of the default CD, DVD or compatible drive. If there is no suitable disc writer installed choose None. This option is used to specify the default drive, i.e. the drive to where AISBackup first looks for backup media.
-
Disc Writer Options: For a detailed explanation of each CD option along with the advantages and disadvantaged of each, click here.
Check one or more of the following CD writer options to make the interface available when creating new backup jobs.
If a CD / DVD writer interface has not been automatically detected or an interface is not working correctly click Troubleshoot CD / DVD writer faults. -
Direct to CD, DVD or Compatible Devices: This interface is used to create backups directly to CD or DVD using a third party Packet Writing system. The CD is created in a format called Universal Disk Format, which is more commonly referred to by the acronym UDF.
This interface should also be used for other direct to disc compatible devices like DVD-RAM or Iomega REV™.
Common Packet writing interfaces include Ahead INCD, Roxio DirectCD or Drag-to-Disc, B’sCliP, Drive Letter Access (DLA) and PacketCD.
If AISBackup does not automatically detect the installed interface this option should be enabled manually, i.e. AISBackup does not need to recognise the interface it just needs to be able to write data directly to the CD or DVD. Refer to the manuals or help text that accompanies the software you have installed.
The Packet Writing interface is recommended for backup to DVD when there is not 4.5GB free disk space which is required by the DVD pre-disk stage area AISBackup will allow a smaller disk stage where it will write multiple sessions to DVD+RW and DVD-RW and on Windows XP DVD-R and DVD+R. -
Enabling the AISBackup Integrated CD Writer:
AISBackup should auto-detect the CD and DVD writers installed in the PC, these instructions are for exceptions or for troubleshooting problems.
If AISBackup does not automatically detect the installed CD / DVD writers use the Troubleshoot CD / DVD writer faults option to auto-detect the drives.
Click the Find button on the detected CD Writer summary form if one or more CD writers are not detected or if the chosen interface does not work correctly. AISBackup will look a suitable interface (called ASPI drivers) and try each in turn. A list of each interface is displayed from which you may select an alternative. For complete instructions on using the find ASPI interface click here.
The AISBackup integrated CD writer is recommended for backup to CD and DVD but a disk based stage size of at least the capacity of the disc is required, e.g. 4.5GB for DVD.
Click here to see supported DVD options. -
Enable Third Party CD Mastering: This option enables AISBackup to pause after creating each CD’s worth of backup data, after which the CD may be created using a third party CD mastering application (including the Windows XP CD writer).
This option should only be enabled if the integrated AISBackup CD writer does not work correctly. -
For Hard Drive Backups, Default Root Location of Backup Files: Specifies the default root location for the backup when the backup is directed to a local disk. When new jobs are created, the location of the backup database will default to [Backup Root Folder]\Job Name, you can of course change this setting.
-
Huge File Size: Sets the file size where a file is deemed ‘huge’. A huge file is backed up in 100 MB segments, or a segment less than the remaining space on the backup media. This allows files that are larger then the backup media to be backed up to two or more CDs, Zips etc. If you do not want to support Huge files select Do not Backup.
-
Compress Huge Files: If you have elected to backup huge files you may also select whether AISBackup should attempt to compress these files. In any event AISBackup will not attempt to compress files that are in the Do not compress file list.
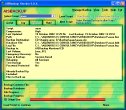
The Options – Program Settings.
Auto Eject CDs when required.
Select this option to enable AISBackup to auto eject CDs when reading
them. If a CD is being written to when it is ejected it may become unusable.
CD authoring software may write to a CD the first time a CD is used with it. If
you are in the process of changing your CD authoring software disable the Eject
CD option until all CDs have been used with you new software.
Show Cue Cards at start-up.
Select this option to display cue cards when AISBackup starts.
Cue cards give step-by-step instructions for most of the functions within
AISBackup.
Show Hints.
Select this option to display additional hints on some controls.
Snap Mouse Pointer to Default Button.
Select to snap the mouse pointer to the default button on dialogue boxes. This
option is independent of the same Control Panel / Mouse Pointer option.
Show File and Folder Attributes.
Shows file and folder attributes on the select files form using the following
key:
- Normal.File : Files with no attributes are shown in black.
- ReadOnly.File : Read Only Files are shown in fuchsia.
- System.file : System files are shown in blue.
- Hidden.File : Hidden files are shown with a faded icon and may additionally be coloured as above.
- Bold.File Are split into segments of up to 100 MB segments during the backup, this enables media spanning of files larger than the backup media. These files are also known as huge files.
- Bold.File Bold files shown in red are huge files that will not be backed up because Huge File Support has been disabled by selecting Do not Backup
on the huge file size selection drop down box (Program Settings tab).
Check for connected CD writer when AISBackup is
started
This option may be used of owners of USB connected CD Writers who do not want to
see the Program Options dialogue each time they start AISBackup when the drive
is not connected.
Show Help Screen at Start-up.
This option hides or displays the help screen that is displayed when AISBackup
is started.
Show Auto Select Files when creating a new backup job.
Use this option to set whether the Auto Select Files form is displayed when
creating new backup jobs.
Automatically allow under sized CD and DVD disk stage.
Backups made using the integrated Disc Writer must me made to a media sized hard
disk stage prior to burning to CD or DVD. This disk stage is up to 4.5GB, which
may not be available on the PC. To get around this problem AISBackup can use a
smaller disk stage at the expense of extra overhead when writing to disc,
especially CD. It is recommended that at least 1GB of disk space is left free
which is more than enough space for CD’s.
AISBackup will reserve 100MB free disk space to avoid any possible problems with
the disk been used to full capacity, so to reserve 1GB for a DVD disc stage you
require 1GB+100MB free hard disk space.
Check this setting to allow under sized disc stage to be used without a warning
message.
This option is not recommended for backups to DVD-R and DVD+R on Windows 95, 98,
ME, NT4, 2000 because AISBackup cannot add new data to these media. Windows XP
is okay.
First Destination Drive.
The drive letters A and B are normally reserved for floppy diskette drives but
these may used by other devices on some PC system’s e.g. Zip drives. If the
first backup destination drive is not C: then choose a new first drive letter
with this option.
Show CPU Usage Setting Bar on Main Form. (Windows NT,
2000 & XP)
Select this option to display a track bar on the AISBackup interface from where
the CPU usage setting may be set. Move the control bar to the right to decrease
the amount of CPU AISBackup uses. To set CPU usage for Auto-Run AISBackup jobs
use the Advanced tab / Auto Running CPU Usage option, see here.
Printer Font and Font Size.
The printer font size and font may be changed. These are the fonts used in the
prints produced by AISBackup. If there is no printer attached these options are
disabled.
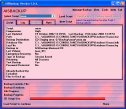
The Options - File Locations
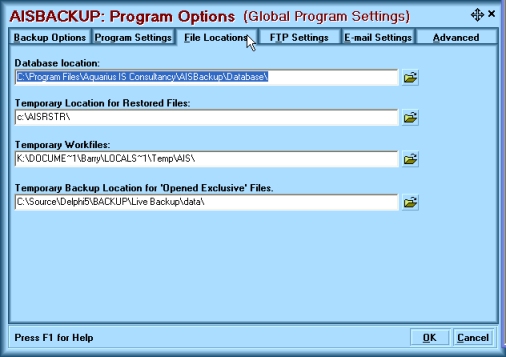
Database Location.
This specifies the folder used to store the Backup Job and Backup Contents File. The default folder is \Database under the AISBackup program folder.
Temporary location for Restored Files.
This specifies the temporary folder to hold files that cannot immediately be restored, because for example, the file(s) may be in use. The directory name should be a maximum of 8 characters to facilitate easy access from a DOS session if required.
The default name of this folder is C\AISRSTR. AISBackup may also create this folder on other drives to facilitate restoring from Windows NT, 2000 and XP.
This drive is transient and may safely be deleted from your system once a restore has completed successfully.
If you change the name of this folder you should also re-create your AISBackup Enhanced Start-up diskette, see Section 1.11.
Temporary Workfiles
This specifies the default folder for any work files created by AISBackup. The default folder is \AIS under your standard Windows Temporary folder. This temporary folder is used when restoring and launching a file by double clicking it from the Restore select files form.
Temporary Backup Location for ‘Opened Exclusive’ Files
If you choose to backup files that have been opened exclusively then these are temporarily copied to this folder prior to adding to the actual backup.
This setting also specifies the folder used to temporarily backup files that may cause the backup media to overflow. The default folder is \Data under the AISBackup program folder

AISBackup can transfer disk-based backups to an FTP server. The
FTP Settings tab is used to set-up and optionally test these FTP settings. The
Tools / Program Settings and Options settings define default values for the FTP
settings; during backup job creation you may refine these settings and apply
additional backup settings. The FTP set-up form is also displayed for FTP style
backups by using the menu option Manage Backup / Change Backup Job Settings /
FTP Settings.
If you do not know what settings to use contact the administrator of your FTP
site. The Test Results display may help with problems such as: Invalid FTP
Server name, Invalid user name, Invalid password and incorrect folder name.
FTP Server Name.
Enter a server name using the format server.com or server.co.uk. Some servers
may need the preceding www.
User Name.
Enter your user name for the server.
Password.
Enter a valid password for the supplied FTP user name.
Remember Password.
Check Remember Password to instruct AISBackup to store the password. AISBackup
encrypts stored passwords. If a password is changed to may alter the password by
using the Manage Backup / FTP Settings menu option. If the password is not
stored you cannot run an un-attended FTP backup job using the task scheduler.
Port.
The usual FTP port value is 21, enter a different value here if different.
Remote Root Folder
This specifies the root directory for the backup on the FTP server. The
directory is created if it does not exist. You may specify multiple directory in
the form /Folder1/Folder2.
AISBackup will create an additional folder under the FTP root folder based on
the job name.
Ensure that you have read and write permissions to the folder. For security
reasons you may want to deny access to all other users. AISBackup cannot set
these permissions itself.
Delete.
Choose Delete to delete the selected ftp parameters from AISBackup.
Test FTP Connection.
Use the Test FTP Connection button to test the settings.
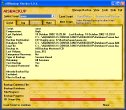
Advanced Settings
Tab
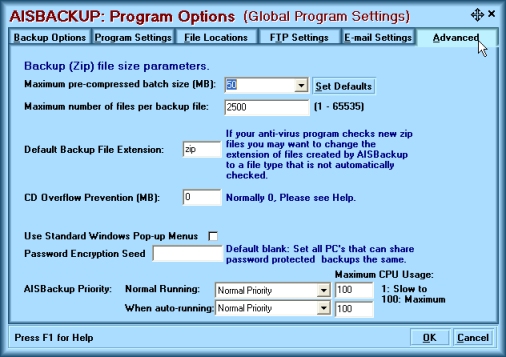
The maximum zip file size and maximum files that are to be
written to a zip file have been designed for good performance of AISBackup’s
many options, including speed of operation of the backup, validation, zip file
pruning, minimising data loss if a zip file becomes corrupt.
Some Users of AISBackup prefer to decrease the number of zip files produced and
the Maximum pre-compressed batch size (KB) and Maximum number of files per
backup file enable this. Increasing the parameter values decreases the number of
zip files produced.
Maximum pre-compressed batch size (KB)
This value sets the maximum pre-compressed file size. This value is
automatically adjusted as free space is decreased on the backup media.
Maximum number of files per backup file
This value sets the maximum number of files that should be written to each zip
file. The maximum pre-compressed batch size overrides this value. The zip file
limit is 65535 files.
Set Defaults
The set defaults button re-sets the default values for Maximum pre-compressed
batch size (KB) and Maximum number of files per backup file.
CD Overflow Prevention (mb).
This value is used to reserve extra space on a CD when using the AISBackup CD
integrated CD Mastering option. Enter a value here if AISBackup reports that
CD’s failed to create because they overflowed. 1 = 1 megabyte.
Flush RAM Cache. (Not shown)
This option is only applicable to Windows 95, 98 and ME so is not shown when
running on Windows NT, 2000 or XP.
Windows automatically places files that are been written to and read from in RAM
to speed up disk access, this area is called File Cache. AISBackup by its nature
reads and writes to a lot of files, this causes Windows to allocate as much RAM
as possible to theses files, this value fools some ‘RAM Recovery’ programs in to
thinking that AISBackup is not releasing Memory, where in fact the File Cache
RAM is available as and when it is required.
With Flush RAM enabled AISBackup will flush (remove files from) the File Cache
RAM and thus go some way to performing a similar task as ‘RAM Recovery’
programs.
Use Standard Windows Pop-up menus.
Form reading software for the partially sighted cannot read the AISBackup menus.
Check this option to enable form reading software to read the menu options.
Password Encryption Seed.
AISBackup has two levels of password:
-
Normal: The user supplied password is assigned to the zip file.
-
AISBackup Encrypted: AISBackup changes the user supplied password to 64 to the power of 40 characters.
AISBackup bases the encryption on a standard starting point
called a seed. If you use the Do not prompt for password on restore
option all copies of AISBackup with the same seed can restore from all backups.
You may use the Password Encryption Seed option to create an encryption
seed unique to your copies of AISBackup. You may enter any value, for example,
your company name, your Father’s Mother’s maiden name. If you forget the
Password Encryption Seed you are very unlikely to restore from a password
protected backup. Ensure that all copies of AISBackup that you want to restore
from shared backups use the same Password Encryption Seed.
The default Password Encryption Seed is no value.
Password protected backups created prior to version 1.8 of AISBackup will not
use Password Encryption Seed, otherwise you would not be able to restore from
them.
AISBackup Program
Priority.
The priority given to AISBackup may be altered for normal running or
auto-running via Microsoft Task Scheduler or shortcut.
CPU usage may only be set on PC’s running Windows NT, 2000, XP and Server 2003.
The priority is split between the AISBackup application priority and maximum CPU
usage, which is sometimes called CPU Throttle. The CPU usage is approximate and
if AISBackup is backing up a block of very small files the CPU usage will
increase.
The CPU usage should be set between 1 and 100 where 100 is maximum CPU usage and
1 causes AISBackup to run very slow indeed.
The CPU usage may be set in real time, during a backup, by enabling the CPU
Usage Track Bar, see here.
OK / Cancel
Once the options have been set, click OK to apply them or Cancel to discard them.
The Skin Option
This button is used to change the
appearance of the AISBackup forms.
 |
 |
 |
 |
Back To Contents or go to Main Form Options.